
How to make leaf skeletons
Several methods are available to make leaf skeletons or ‘cleared’ leaves. There is a strong tradeoff between the simplicity of a method and the quality of the results that it gives. I have tried to list all of the options, ranging from approaches you can try at home to methods for which you need a chemical laboratory!
All these methods rely on the different physical and chemical properties of leaf veins relative to the rest of the leaf (the lamina). Veins are primarily made of lignin, a carbon-rich molecule that is dense, strong, and resistant to most chemicals. Most treatments described below preferentially erode lamina tissue, leaving venation tissue behind as a skeleton. However lignin can also be damaged by mechanical stress or overzealous application of chemicals, so some methods will not show you the leaf’s complete skeleton. The vein network also responds differently to light and to some dyes. Some methods provide contrast by relying on differential absorption or scattering of light in the vein network.
Making skeletons at home - soda and maceration
This method is easy to try at home or in the classroom. However it will only be successful with tougher leaves like maples, magnolias, etc. Additionally, it will certainly destroy the very finest veins in the leaf.
Materials
30 g (2 tbsp) sodium carbonate (washing soda), sodium bicarbonate (baking soda), or sodium hydroxide (lye)
50 mL 5% sodium hypochlorite (household bleach)
Latex or nitrile gloves
Toothbrush or paintbrush
Paper towels
Method
In a pot on a stove, dissolve your chemical of choice in a quart (~1L) of water. Place several leaves in the solution, and bring the pot to a simmer (~80°C). Allow leaves to ‘cook’ for 1 hour - 1 day, depending on the thickness and toughness of the leaves. The solution may turn a dark brown color from tannins in the leaves. If necessary, replace it with fresh solution every 4 hours. When leaves are softened and appear to be disintegrating, remove them and rinse them carefully in clean water. Wear gloves - the solution is caustic and can irritate or burn your skin!
Place each leaf on a paper towel. Use the toothbrush or paintbrush (or your fingertips) to rub the leaf surface until portions of the lamina peel off, revealing the vein network. You will need to repeatedly wash and soak the leaf in fresh water during this process. Be patient!
When each leaf has been satisfactorily skeletonized, it can be optionally bleached white. If desired, soak the leaf in the bleach mixed with 250 mL (1 cup) of water until it turns white. Remove it immediately and rinse with water; the bleach will weaken the final skeleton. You can also dye the leaf with food coloring. Now press the leaf flat between dry paper towels and several heavy books. Allow it a day to dry. You now have a skeleton that shows the larger veins in the leaf!
Leaf clearing in the lab - our standard protocol
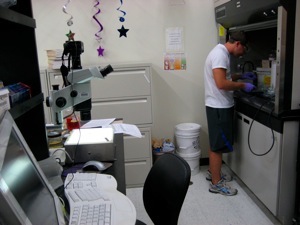
I use this method in my lab to prepare all types of leaves for high-resolution imaging and permanent mounting. This method has been adapted from several other sources which I describe in more depth below. The method assumes you have square-centimeter sections of leaves that you wish to slide-mount, but is adaptable to entire leaves. Just ignore the directions involving PVC end-caps, and treat your leaves very carefully as they will easily tear without being supported underneath. Do not attempt this protocol unless you are working in a well-ventilated space (fume hood) and are knowledgeable about proper chemical disposal and safety practices. For example, toluene is both dangerous to your health and flammable! We are required to dispose of all these chemical solutions as hazardous waste. Please do not pour solutions down the drain!
35 1” PVC end-caps with ~20 3/32” holes drilled through each cap’s bottom
6 Pyrex casserole dishes with lid
1 temperature-controlled hotplate
3 glass jars with lids, mouth diameter at least 5cm
1 pair metal tweezers
18 popsicle sticks
1 bottle PVC cement (e.g. PVC resin in volatile solvents like tetrahydrofuran)
35 25 mm x 75 mm glass slides
35 25mm x 25 mm no. 1 glass goverslips
1 micropipettor + box of 200 microliter tips
50 g sodium hydroxide powder/pellets
500 mL 5% w/v sodium hypochlorite/water solution (i.e. household bleach)
2.5 L ethanol (absolute; denatured alcohol will not work!)
10 g safranin O stain
200 mL toluene
20 mL Permount or Pro-Texx mounting medium (e.g. phthalate ester dissolved in toluene)
Paper towels
Nitrile gloves
Safety goggles
Method (more details for our lab here)
For all steps, make sure you are wearing gloves and goggles for safety! Place each leaf sample in a PVC end-cap. To label samples, snap each popsicle stick in half and write a unique label on each using pencil. Dip each stick in PVC cement and allow to dry under a fume hood. Then place each stick, rounded side down, in the appropriate PVC end-cap.
Digest non-venation tissue. Make a solution of 50 g sodium hydroxide in 1 L water in a Pyrex dish. Place all 35 PVC end-caps with leaves in this solution; they should fill the dish and not be free to move. Place the dish, with covered lid, on the hotplate. Allow leaves to heat at 80°C for 2-3 days; leaves are done when they become transparent. Very thick leaves may require more time; thinner ones, less. Do not leave samples in for too long; they will disintegrate! If bath solution becomes dark brown, replace it with fresh but do not allow leaves to dry.
Prepare a solution of 1.5 L water in a second Pyrex dish. Use tweezers to transfer all PVC end-caps with leaves to this solution. Tilt the dish repeatedly to wash leaves.
Bleach venation tissue in preparation for staining. Prepare a solution of 500 mL water and 500 mL 5% sodium hypochlorite in a third Pyrex dish. Use tweezers to transfer all PVC end-caps with leaves to this solution. Watch the leaves carefully; when each has turned a pale white color, transfer it in the PVC end-cap back to a dish filled with clean water. If you let your leaves bleach for too long, they will disintegrate! 5-30 minutes is likely sufficient. This bleach solution can be re-used if you cover the dish.
Prepare a solution of 500 mL ethanol and 500 mL water in a fourth Pyrex dish. Transfer all PVC end-caps with leaves to this solution and tilt the dish several times to ensure leaves are saturated. You can re-use this solution several times, but keep the dish covered as ethanol evaporates readily and can cause dizziness or fires.
Stain veins a dark red color with a lignin-specific dye. Prepare a solution of 10 g safranin O in 1 L ethanol in a fifth Pyrex dish. Transfer all PVC end-caps with leaves to this solution. Allow to stain for 5-15 minutes; tilt the dish if you desire. This solution can be re-used many times but may require replenishment with new ethanol if evaporation has occurred.
Destain leaves. Prepare a sixth Pyrex dish by filling it with ethanol. Quickly transfer all PVC end-caps with leaves from the staining solution to this dish. You must move quickly (< 1 second) to prevent full evaporation of ethanol from samples, which will destroy them. Allow leaves to de-stain in this dish (covered) for at least 30 minutes. Longer times are not harmful. When this dish’s solution has turned a dark red (pink or light red is still okay) you may want to replace it with fresh ethanol. Waste ethanol can be used to replenish the fourth or fifth Pyrex dish; the extra stain will not compromise the protocol.
Prepare leaves for mounting one by one. Fill a small glass jar with 50% ethanol and 50% toluene, and fill a second glass jar with 100% toluene. The level of the solution in the jar should be no higher than the height of the PVC end-cap (i.e. about 3 cm). Using tweezers as before, quickly (< 1 sec) transfer a PVC end-cap from the sixth Pyrex dish to the jar filled with 50% ethanol and 50% toluene. Swirl the jar to ensure the leaf is saturated by the new solvent. Quickly transfer the PVC end-cap to the 100% toluene jar and swirl as before. Make sure you are working with adequate ventilation!
Prepare a slide for mounting. Place a clean slide on a paper towel. Use the pipettor to deposit a thin, bubble-free layer of mounting medium on the center of the slide; approximately 100 microliters will be sufficient. Now use the tweezers to quickly transfer the leaf sample (and not the PVC end-cap) from toluene onto the mounting medium on the slide. Lay the sample flat; it should be quite stiff and maneuverable. Use the pipettor to cover the sample with another 50 microliters of mounting medium. Be liberal - the mounting medium shrinks as it dries and can introduce bubbles. Quickly cover the sample with a coverslip, letting surface tension pull the coverslip onto the sample. Now remove the PVC end-cap and popsicle-stick label from toluene and allow to dry in a well-ventilated area, after which it can be re-used. Label the slide and allow it to dry for 2-3 days in a well-ventilated area, potentially on a warm (50°C) surface. Repeat this procedure for all other samples. Toluene and toluene/ethanol solutions can be re-used until they turn a dark pink or red color, at which point they should be changed for fresh.
If you are working with whole leaves, these can be permanently mounted with similar methods between thin acetate transparency sheets instead of glass. Whole leaves can also be mounted in Cargille Type B immersion oil (after being removed from pure toluene) between thin (0.001”) transparent teflon (polytetrafluorethylene) films.
Leaves are imaged using bright-field trans-illumination with either a dissecting or compound microscope coupled to a high resolution CCD.
Alternative modern chemical clearing methods
There are many other approaches for chemically clearing leaves. Below are references to several other methods that have been successful.

W. Buechler has prepared a handbook of alternative leaf clearing methods that are suitable for use at home or in a classroom. Many of these methods do not require dangerous chemicals for mounting. He has graciously allowed me to publish it here.
2010 Buechler Alternative Leaf Clearing and Mounting.pdf
S. Ruzin gives details for another method involving chloral hydrate (which is now difficult to obtain).
1999 Ruzin Plant microtechnique and microscopy.pdf
R. Gardner explores the chemistry that underlies several methods.
Stain Technol 1975 GARDNER Overview of Botanical Clearing Technique-1.pdf
L. Hickey also describes similar methods for clearing many types of leaves. These methods are extended in the current Manual of Leaf Architecture, which is a book well worth purchasing!
American Journal of Botany 1973 Hickey Classification of the architecture of.pdf
New York Botanical Garden 2009 Ellis Manual of Leaf Architecture.pdf
E. Haritatos (image from her work on left) and F. Carland describe alternative methods for clearing particularly delicate leaves including those of the model plant Arabidopsis thaliana. Dark-field microscopy helps to provide contrast.
Planta 2000 Haritatos Minor vein structure and sugar.pdf
Carland Genetic Regulation.pdf
T. O’Brien describes a novel method using lactic acid or potassium hydroxide and an autoclave to quickly clear delicate tissue.
Biotechnic and Histochemistry 1974 von Teichman Autoclaving as an aid in.pdf
More exotic modern methods
Extensive chemical treatments are not the only way to isolate leaf venation. Below are some of the more interesting ways to achieve this goal.
R. Whittenberger uses fermentation by Clostridium roseum bacteria. I have not tried this technique myself.
American Journal of Botany 1948 Whittenberger Separation and mounting of leaf.pdf
A. Jeje induces leaves to uptake a fluorescent dye into their veins, which he then is able to photograph.
Biorheology 1985 Jeje The flow and dispersion of.pdf
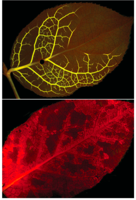
E. Katifori presents a more recent approach to fluorescence imaging of vein networks (figure shown to the left).
Phys. Rev. Lett. 2010 Katifori Damage and Fluctuations Induce Loops.pdf
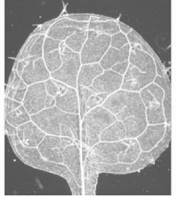
S. Wing and M. Raikes demonstrate that x-ray imaging of venation networks is also possible. This technique requires specialized x-ray equipment that is no longer very easy to obtain.
American Journal of Botany 1992 Wing High-Resolution Leaf X-Radiography in Systematics.pdf
Radiographics 2003 Raikes Floral radiography Using X rays.pdf
I have noticed that leaves will become skeletonized naturally in streams and on forest floors. I can find no references that detail how to replicate this process.
Historical methods

-
Verum me ineptum! quid praeterieram opuntii folii resolutionem artificiosam? Parabitur haec porro simplici tabefactu per affusam uberem aquam, tamdiu complexuram, dum fibris lignea durite vestibilibus omnis exsolvatur carnea portio. Quae tibi ars ad analyses plerasque felici soli servator, nulli praeterquam Achati revelanda. Fuit huic fabricae opificium divinum in Dendranatome me parva, apud Zootomiam, enarratum.
This method amounts to letting leaves sit in water for an extended period of time, after which the lamina loosens and the veins can be seen. He mentions publishing this method in a treatise, Zootomia Democritea - idest Anatome Generalis Totius Animantium Opifici but I unable to show you a scanned copy of this book.
In 1723, the botanist Frederick Ruysch also publishes a method in his Adversariorum Anatomico - Medico - Chirurgicorum Decas Tertia:
-
Neque latere velim artem, qua arcanum hoc detegitur. Impono illos explorandos fructus aquae, donec incipiunt putrescere, deinde vero eos vasi figulino immito, cujus fundus planus est, sicque positos deglubo lente; excorticatos dein diu agito hinc inde per aquam, ut hoc concussu solvantur a mutuis complexibus vasa, simul autem blande lenteque comprimo inter digitos, donec incipiat dissolutio fieri.
This method calls for leaves to be placed in a clay vessel filled with water until they begin to decay, after which one stirs the water and rubs the leaves with fingers until the lamina detaches. I am unable to provide a scanned copy of this book.
And by 1729 the notable zoologist and eccentric Albertus Seba has communicated another method to the Royal Society of London. This method does not differ much (except in language) from that of Ruysch.
Philosophical Transactions (1683-1775) 1729 Seba The Anatomical Preparation of Vegetables.pdf
In 1770 the doctor John Hill has described methods for seeing venation in leaves (which he calls ‘rind’) that involve chemical preparations of ‘sugar of lead’, ‘orpiment’, etc. I do not recommend trying this method but have excerpted it below.
1770 Hill The construction of timber.pdf

Leaf skeletonization becomes a popular craft in the United States by the 1860s. Within two years of each other, E. Parrish publishes The Phantom Bouquet and an anonymous author publishes Skeleton Leaves & Phantom Flowers - both are booklets describing how to ‘embellish the home of taste’. Their methods also involve long maceration in water and careful brushing of leaves.
J.E. Tilton and Company (Boston) 1864 Anonymous Skeleton Leaves & Phantom Flowers.pdf
JB Lippincott 1863 Parrish The phantom bouquet a popular.pdf
Finally, a United States patent was issued for this maceration procedure in 1877 to an I. Rogers.
United States Patent 1877 Rogers Improvement in Processes of Skeletonizing.pdf
We shall leave our history here!